Friday, September 30, 2016

Magical ATC for the Stamped Background Swap


Here's my second ATC for Stampotique's "Stamped Background" ATC Swap. This ATC features Safina (Karen Hayselden), the Romantic Text Background (France Papillon), and the Tall Word Collage stamps.

Safina was stamped with Tuxedo Black Memento ink (Imagine Crafts), colored with Copic markers, fussy-cut, and edged with Golden Glitz Delicata ink (Imagine Crafts). Safina was put aside while I created the ATC background.

White cardstock was adhered to thick black cardstock and cut to ATC size. The white side of the ATC was sponged with Salty Ocean, Spun Sugar, and Shaded Lilac Distress ink (Ranger).  The sponged ATC was heat set, stamped with the Romantic Text Background stamp using Golden Glitz Delicata ink, and heat set to bring out the glitziness of the ink. The stamped sponged ATC was then edged with the same gold ink.

An excess piece of the sponged cardstock was die-cut with one of the dies from the Sentiment Frame die set (Cherry Lynn Designs). "Magical" from the Tall Word Collage was stamped using Golden Glitz Delicata ink.

 Safina and Tall Word Collage sentiment were adhered to the front of the ATC and I called it done!

Thanks for visiting today!


Thursday, September 29, 2016

Time Flies ATC -- Stamped Background Swap


My "Time Flies" ATC uses Stampotique's Timeless (Amy Wilson-Wellenstein) and the wings from the Owl with Wings (Jo Capper-Sandon) stamps. 

Timeless was stamped twice with Tuxedo Black Memento ink (Imagine Crafts) onto white cardstock. Both images were colored with Copic markers.

One colored Timeless image was cut to ATC-size and edged with Golden Glitz Delicata ink (Imagine Crafts).

The second Timeless image was die-cut with a heart die (QuicKutz), then stacked atop several other cardstock hearts that had been die-cut as well. The stacked stamped die-cut heart was coated with a layer of Media Crackle Glaze (DecoArt) and allowed to dry. Once dry, I rubbed Golden Glitz Delicata ink over the crackled surface, allowing the gold ink to settle into the cracks. I wiped off the excess ink, then edged the heart with the gold ink.

Owl with Wings was stamped with Tuxedo Black Memento ink and the wings were colored with Copic markers, fussy-cut, and edged with a black marker.

The wings from Owl with Wings were adhered to the ATC, then the die-cut heart was adhered.

Gold metallic cardstock was die-cut with the Daisy font dies (QuicKutz) and then adhered to the ATC.

Thanks for visiting today!

Tuesday, September 27, 2016

Meet Lotus Blossom!

Here's my card with Lotus Blossom, one of the wonderful stamps in the Reflections - Fantasy Collection (Carmen Medlin) at I Brake for Stamps.


Lotus Blossom was stamped with Tuxedo Black Memento ink (Imagine Crafts) and colored with Copic markers to match patterned paper from the Kioshi Collection (Basic Grey). All the patterned paper was edged with Black Soot Distress ink (Ranger).

Shimmery black cardstock was die-cut with one of the dies from the Chains set (Elizabeth Craft Designs) and one of the dies from the Oriental Embellishment die set (Tattered Lace).

I intentionally left off a sentiment since I don't know who will receive this card for which occasion.

The card was assembled and I called it done!

I Brake for Stamps has a huge and varied collection of rubber stamps that you ought to check out right now. Click on my badge below to be whisked over to I Brake for Stamps to check out all of the goodies! Best of all, if you buy something, you can get a 10% discount off of your purchase if you use this code: SAVE10KATHI!


Thanks for visiting today!

Monday, September 26, 2016

Put a Bug On It Challenge!

This week's Stampotique Designer's Challenges (#257) is "Put a Bug On it".

If you'd like the chance to win your choice of $30 worth of Stampotique stamps, you should play along with this challenge. Visit Stampotique Designers Challenge blog and be sure to read the rules so that you'll have the chance to win that great prize!!! Remember to check to see the deadline for all of this month's Stampotique Designers Challenges!

While looking through my cache of Halloween patterned papers, I came across a sheet from a My Mind's Eye 6x6 pad that I thought would be perfect for this challenge. Plan A for this paper didn't work out, but Plan B did.

Here's my second card for this challenge, using Old Timey Frog (Kira Nichols).


Old Timey Frog was stamped onto the patterned paper then onto white cardstock using Tuxedo Black Memento ink (Imagine Crafts). Just the frog part of the image was fussy-cut, colored with Copic markers, and edged with a black marker. The frog was then paper-pieced in position atop his counterpart riding the Penny Farthing bicycle. 

The patterned paper was edged with Wild Honey and Black Soot Distress inks (Ranger)Road-patterned Washi tape was added to the base of the image panel, sentiments from a Chit Chat sticker sheet (Idea-ology) were added, and the panel was adhered to an A2 card.

Thanks for visiting today!

I shall enter this card into the following challenges:

Wednesday, September 21, 2016

Put a Bug On It (or a spider)!

This week's Stampotique Designer's Challenges (#257) is "Put a Bug On it".

If you'd like the chance to win your choice of $30 worth of Stampotique stamps, you should play along with this challenge. Visit Stampotique Designers Challenge blog and be sure to read the rules so that you'll have the chance to win that great prize!!! Remember to check to see the deadline for all of this month's Stampotique Designers Challenges!


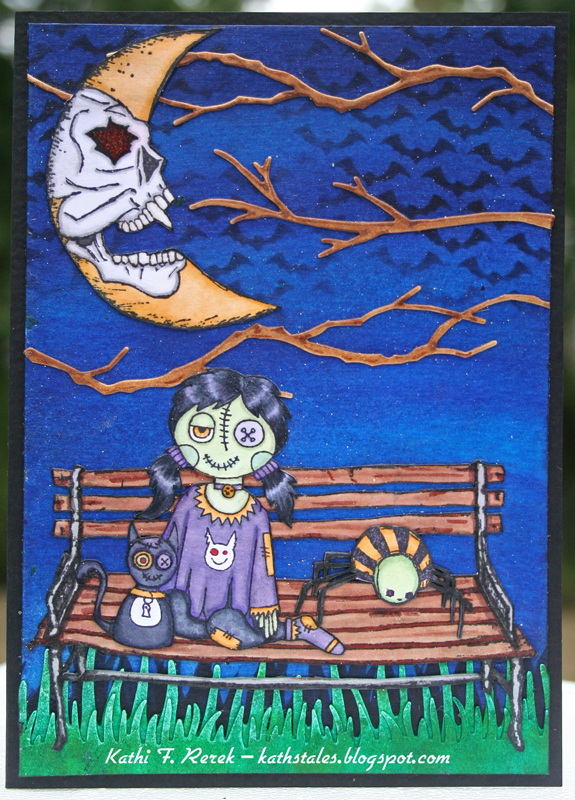
You might have guessed that this card was inspired by the Little Miss Muffet nursery rhyme. My version stars Little Miss Zombie with the tuffet replaced by a bench and no curds/whey. Should have substituted a bowl of brains?

It should also be noted that my spider, Mr. Stripes, is an arachnid, not an insect. So there.

Skull MoonLolaSit Down, and Mr. Stripes were stamped with Tuxedo Black Memento ink (Imagine Crafts), colored with Copic markers, fussy-cut, edged with a black pen, then set aside while a background was created for them.

140 lb. Mixed Media cardstock (Strathmore) was sponged with a wash of Pthalo Blue and Dioxazine Purple Media Fluid Acrylic (MFA) paints (DecoArt) . When the paint was dry, Jet Black Archival ink (Ranger) was sponged over the grass on Carnival stencil (Fairytale Creations) and over the Batground Layering stencil (Stampers Anonymous).

A scrap of Mixed Media cardstock was die-cut with both Grassy Edges dies (Die-namics). The grass was then painted with Pthalo Green Yellow, Pthalo Green Blue, and Green Gold MFA paints. Another scrap of Mixed Media cardstock was die-cut twice with the Woodland Branch die (Memory Box) and the Branch die (Savvy Stamps). All three branches were colored with Copic markers.

The painted Grassy Edges die-cuts and the branch die-cuts were adhered to the painted background with Media Matte Medium (DecoArt), which was then used to adhere Skull MoonLolaSit Down, and Mr. Stripes. I realized after the fact, that I should have left each layer to dry a bit longer before adding the next element, but I suppose that I was either "in the zone" or impatient. Probably both. However, I was fortunate that the little white bits look rather like stars, so it's all good. Happy accidents and all don'tchaknow.

When the piece was dry, I added Garnet, Lipstick Red, Red, and Lemon Yellow Spica Glitter pen to the Skull Moon's and Lola's cat's eye. Purple Spica Glitter pen was added to Mr. Stripes eyes. Several layers of Clear Glaze Gel pen were added to the button eyes on both Lola and her cat's eyes, Skull Moon's eye and teeth to give them all a dimensional glossy look.

My last step was to edge the image panel with Jet Black Archival ink and adhere it to a black card.

Looking at it now, I do wish that I had put Lola on the right side and Mr. Stripes on the left of the Sit Down bench. Oh well.

Thanks for visiting today!

I shall enter this card into the following challenges:
Addicted to Stamps Challenges: Trees, Leaves, Branches
Creative Artiste Mixed Media Challenges: Anything Goes
Stamps and Stencils Challenges: The Colors of Autumn

Tuesday, September 20, 2016

Just a Thank You Gnote


It's always good to have some Thank You cards on hand, so I decided to make a Thank You Gnote featuring the largest Gnome from the Gnome Sheet (I Brake for Stamps). This fabulous large gnome is one of NINE (9) gnomes and a mess of mushrooms on that sheet. It's a Gnoteworthy bargain indeed.

The Large Gnome was stamped with Tuxedo Black Memento ink (Imagine Crafts), fussy-cut, colored with Copic markers, and edged with a black marker. He was set aside while I pulled together a nice background for him.

I vaguely remembered that I had some very leaf patterned paper that would work well with the way I colored the Large Gnome! Better yet, I even found it buried deep in a file of 12x12 patterned papers. I should mention that one can amass quite the patterned paper collection after 16+ years of paper crafting, especially if one had to buy multiples of certain patterns because one was afraid she might run out. It's a sickness, kinda like referring to oneself in the third person.

Anyway, I found the leaf patterned paper and a nice plaid that coordinated with it. They were cut to size and the brown-based patterned papers were edged with Gathered Twig Distress ink (Ranger) and the plaid was edged with Evergreen Bough Distress ink.

Brown cardstock was die-cut with the Just a Note die (All Occasion) and the Small Alphabet Font dies (All Occasion).

The patterned paper was layered, the sentiment was added, and the Large Gnome was adhered. The card front was then adhered to a brown A2 card.

I Brake for Stamps has a huge and varied collection of rubber stamps that you ought to check out right now. Click on my badge below to be whisked over to I Brake for Stamps to check out all of the goodies! Best of all, if you buy something, you can get a 10% discount off of your purchase if you use this code: SAVE10KATHI!


Thanks for visiting today!

Tuesday, September 13, 2016

'tis the season

It was actually cool this morning and I've noticed that the leaves are beginning to change color. This means that 'tis the season to get spooky, wicked, and celebrate haunted things.


Rock Star Eyes Alex was stamped with Tuxedo Black Memento ink (Imagine Crafts), colored with Copic markers, fussy-cut, then edged with a black pen. She was set aside while I created a background for her.

I found a piece of patterned paper that featured a spooky forest scene in mostly greyscale, cut it to size, then sponged Victorian Velvet, Hickory Smoke, and Black Soot Distress inks (Ranger) around the edges. Picket Fence Distress ink was sponged over the Mini Crossbones Layering Stencil. Victorian Velvet Distress ink was sponged over the Mini Flourish Layering Stencil and the words "spooky", "wicked", and "haunted" from the Mini Halloween Layering Stencils. Black Soot Distress ink was sponged over the Mini Batground Layering Stencil. The piece was edged again with Black Soot Distress ink and road-patterned washi tape was added.

The colored and fussy-cut Rock Star Eyes Alex image was adhered to the stenciled inked patterned paper panel, matted on a piece of matching patterned paper, then adhered to a black A2 card. A "'tis the season" sticker, from the Seasonal Chitchat sticker collection.

I Brake for Stamps has a wonderful selection of Carmen Medlin Designs stamps  and a plethora of other great rubber stamps. You should check 'em all out. Tell them I sent you! Click on my badge below to be whisked over to I Brake for Stamps to check out all of the goodies! Best of all, if you buy something, you can get a 10% discount off of your purchase if you use this code: SAVE10KATHI!


Thanks for visiting today!

Friday, September 9, 2016

Imagine!

Here's a whimsical, slightly spooky card, featuring  Elf Silhouette (Stampinback)  that is available at I Brake for Stamps.


I wish you could see this one in person as the photo doesn't show the shimmer of the card. Here's how I created it!

Paris Dusk, Sky Blue, and Shell Pink Memento inks (Imagine Crafts) were sponged and blended over shimmery white cardstock.

Shadow Grey Archival ink (Ranger) was sponged over the Mini Wildflower Layering stencil (Stampers Anonymous). Blue Violet Archival ink was sponged over the Tornado stencil (Andy Skinner/DecoArt). Shadow Grey Archival ink was sponged over the grass portion of the Carnival stencil (Fairytale Creations). Jet Black Archival ink was sponged over "Imagine" from the Mini Inspired stencil (The Crafter's Workshop).

Finally Elf Silhouette was stamped with Jet Black Archival ink. Yellow and Orange Sharpie pens were used to add a bit of a gleam to the eye. The image panel was edged with Jet Black Archival ink, then adhered to the card front.

I Brake for Stamps has a large selection of Stampinback stamps and a plethora of other great rubber stamps. You should check 'em all out. Tell them I sent you! Click on my badge below to be whisked over to I Brake for Stamps to check out all of the goodies! Best of all, if you buy something, you can get a 10% discount off of your purchase if you use this code: SAVE10KATHI!


Thanks for visiting today!