Wednesday, May 31, 2017

Cats 'n Books! Perfect Together!

This week's challenge at Stampotique Designer's Challenges is "Oldies but Goodies!" Here's the blurb about the challenge!
"Well, we want you to use one of your older stamps but even though it's an older one, you absolutely love it! "
If you'd like the chance to win your choice of $30 worth of Stampotique stamps, you should play along with this challenge. Visit Stampotique Designers Challenge blog and be sure to read the rules so that you'll have the chance to win that great prize!!! Remember to check to see the deadline for all of this month's Stampotique Designers Challenge blog!


Cat on Books was stamped with Tuxedo Black Memento ink (Imagine Crafts) and colored with Copic markers. The image panel was trimmed and matted with black cardstock.

Livres was stamped multiple times with the help of my Stamp-a-Ma-Jig stamp positioner, then colored with Copic markers. This image panel was also matted with black cardstock, then theCat on Books image panel was adhered over it.

The sentiment was added with Chit-Chat, Big Chat, and Label Letters stickers (Idea-ology), then the card front was adhered to a kraft card.

Thanks for visiting today!

I shall enter this card into the following challenges:
Simon Says Wednesday Challenges: Anything Goes
Show Us Your Pussies Challenges: Furrything Goes
Addicted to Stamps Challenges: Animals

Tuesday, May 30, 2017

Sew Easy!

Here's a card with the Sew Easy rubber stamp set from the Curiosities Set #4 by Carmen Medlin Designs, available at I Brake for Stamps. By the way, IBFS ships internationally!


The seriously cute critter from the Sew Easy set was stamped with Tuxedo Black Memento ink (Imagine Crafts) and colored with Copic markers that were selected to match the patterned paper from the old Threads 6x6 pad (Basic Grey). The image panel was die-cut with one of the dies from the Horizontal Stitched Strips die set (Die-namics)

Patterned paper from the Threads pad were layered and then die-cut with a stitched rectangle die. The edges were sponged with Black Soot Distress ink (Ranger). Striped Washi tape was adhered to the seam between the floral and solidish patterned paper. A fine point pen was used to detail the stitches, then the Sew Easy image panel was adhered. 

Leftover solidish patterned paper was die-cut one of the dies from the Dimensional Banners die set (Die-namics) and the sentiment from the Sew Easy set was stamped with Jet Black Archival ink (Ranger). The banner was folded and the white bits were colored with Copic markers to match the patterned paper, then the banner's edges were sponged with  Black Soot Distress ink.

The sentiment banner was adhered using dimensional foam adhesive in the center of the die-cut and flat adhesive on the ends.

I Brake for Stamps has a huge and varied collection of rubber stamps that you ought to check out right now. Click HERE to check out all of the goodies! Best of all, if you buy something, you can get a 10% discount off of your purchase if you use this code: SAVE10KATHI


Thanks for visiting today!

Saturday, May 27, 2017

What's Up? Giorgio is up!

Here I go again, combining this fortnight's challenge "Oldie But Goodie" challenge at Stampotique Designer's Challenges with Stampotique's Facebook Group's "Word-Up Weekends" where we share projects created with Stampotique's many Words, Phrases, Letters, and Numbers.

If you'd like the chance to win your choice of $30 worth of Stampotique stamps, you should play along with this challenge. Visit Stampotique Designer's Challenges and be sure to read the rules so that you'll have the chance to win that great prize!!! Remember to check to see the deadline for all of this month's Stampotique Designers Challenge blog!

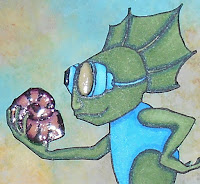
Giorgio was stamped with Tuxedo Black Memento ink (Imagine Crafts), colored with Copic markers, fussy-cut, and edged with a black marker. Giorgio's goggle lenses and his shell were coated with several layers of Clear Gelly Glaze pen (Sakura) to make them dimensional and shiny.

Here's a close-up to see the shiny dimension on Giorgio's goggle lenses and his shell.


Giorgio was set aside while I created a background for him. Spiced Marmalade, Broken China, Cracked Pistachio, and Tea Dye Oxide Distress inks (Ranger) were smushed onto my craft mat, spritzed with water, and a piece of 140 lb. Mixed Media cardstock (Strathmore) was dipped, dragged, and pressed into the ink, sprayed with water, and heat set. This process was repeated until I was happy with the look.

Bundled Sage and Peeled Paint Distress inks were sponged over the Moving Vines stencil (The Crafter's Workshop). The tree/coral from the Design Cube was stamped with Abandoned Coral Distress ink. The stamped image was immediately dabbed with a paper towel to soften it. This process was repeated with Tea Dye Distress ink. 


Old Linen Distress paint was dabbed along the bottom of the image panel, then heat set. This was repeated several times until layers of paint were built up a bit. Some of the paint was intentionally heat set too long to make the paint bubble to add additional texture. When the paint dried, Pumice Stone Distress marker was used to add some depth and detail to the the painted area to make it appear more like sand. Pumice Stone Distress ink was sponged along the edges of the image panel.

"This Side Up!" from the Barcode Text stamp was stamped with Jet Black Archival ink (Ranger), was adhered in place, and the image panel was adhered to a card front.

Thanks for visiting today!

I shall enter this card into the following challenges:
Creative Artist Mixed Media Challenges: Anything Goes
Crafty Awesomeness Challenges: Anything Goes
Creatalicious Challenges: Anything Goes (Stencils Option)
Let's Craft and Create Challenges: Create a Background

Tuesday, May 23, 2017

Spring Time Cat!

Cats plus flowers make me happy. The Purrfect Day Cats rubber stamp sheet (Stampinback), available at I Brake for Stamps makes me really happy ecstatic because the sheet includes TEN floral cat silhouettes, four paw prints, two sentiments, one fish skeleton, and one matching flower for a total of 18 fabulous images in this stamp set, which means you'll be seeing LOTS of flowery cats! By the way, IBFS ships internationally.

Here's my card with one of the ten floral kitties!


Fossilized Amber Distress Oxide ink(Ranger) was smooshed (technical term) onto my craft mat, spritzed with water, and then 140 lb. Mixed Media cardstock (Strathmore) was dragged through the diluted ink and heat set. This step was repeated with Spiced Marmalade Distress Oxide ink, then Worn Lipstick Distress Oxide ink. When I was happy with the coverage,  Post-It Notes were placed across the cardstock and Peeled Paint Distress Oxide ink was sponged over top. I wasn't really thrilled with the color, so I sponged Peeled Paint Distress and Mown Grass Distress ink over top.

Using my Stamp-a-Ma-Jig stamp positioner, the kitty from the Purrfect Day Cats sheet was stamped with Onyx Black VersaFine ink (Imagine Crafts). I had to re-ink the stamp and stamp it again to get better coverage probably because I was too inept to get it right the first time. I can't wait to get ahold of the of one of the new trendy stamp positioner systems so that I don't have to be quite so careful when re-stamping an incomplete image! Anyway, I touched up the image using a Black Pitt Artist Brush pen (Faber Castell).

A shadow was added under the cat using a Warm Grey Pitt Artist Brush pen.

The image panel was die-cut with one of the dies from the Mixed Rectangles Layering dies (Tonic Studios). A larger die from the same set, the "Purr-fect" die from the Cat Paw Print die set (Frantic Stamper), and the word "Just" from the Just a Note die (All Occasions) were used to die-cut black cardstock. The image panel was matted with the plain black rectangle die-cut. The sentiment was adhered in place.

The leftover Distress Oxide sponged cardstock was die-cut with the Butterfly die (Impression Obsession) and punched with a tiny dragonfly punch. The butterflies and the dragonflies were a bit boring, so I added Distress ink to them to perk 'em up a bit. My black marker was used to detail their bodies and edge them, then Black Spica Glitter pen was used to add a touch of glitter to them. The insects were adhered to the image panel and a Clear Stardust Gelly Glitter pen (Sakura) was used to add flight trails. The cardfront was adhered to a rust card.

I Brake for Stamps is where you'll find great selections of Stampinback stamps plus lots of other stamps from other stamp companies. Click on my badge below to be whisked over to I Brake for Stamps to check out all of the goodies! Best of all, if you buy something, you can get a 10% discount off of your purchase if you use this code: SAVE10KATHI!


If you have any questions about the techniques or products I used, feel free to ask!

Thanks for visiting today!

Wednesday, May 17, 2017

My Own Little World!

This week's challenge at Stampotique Designer's Challenges is "For the Boys!" Here's the blurb about the challenge!
"Sometimes it's so difficult to create a "guy" card or project so we want to challenge you to do just that this week."
If you'd like the chance to win your choice of $30 worth of Stampotique stamps, you should play along with this challenge. Visit Stampotique Designers Challenge blog and be sure to read the rules so that you'll have the chance to win that great prize!!! Remember to check to see the deadline for all of this month's Stampotique Designers Challenge blog!

Here's my card with Mokiwea (Daniel Torrente), Design Cube #2 (France Papillon), and Quotes #1 (Carol's Collection).


Mokiwea was stamped with Tuxedo Black Memento ink (Imagine Crafts), colored with Copic markers, fussy-cut, and edged with black marker. A silver gel pen was used to add detail to the studs on Mokiwea's trousers. Mokiwea was set aside while I created a world for him.

A piece of Kraft Resist Paper Stash (Idea-ology) was sponged with Broken China and Wilted Violet Distress Oxide inks (Ranger), spritzed with water, and heat set. This was repeated until I was pleased with the look, though I then proceeded to cover up most of it. Poor planning on my part I suppose!

Black Shimmer Delicata ink (Imagine Crafts) was sponged over the New York City Skyline Stencil and Masks (Michelle Ward/The Ink Pad). Broken China and Wilted Violet Distress Oxide inks were sponged over the clock on the Made To Measure stencil (Andy Skinner/DecoArt). Black Soot Distress ink was sponged over the Mini Batground Layering stencil (Stampers Anonymous).

The hexagon pattern from the Design Cube #2 was randomly stamped with Faded Jeans Distress ink (Ranger). 

Ruler patterned Washi tape was adhered to the base of the background panel, then Mokiwea was positioned and adhered.

Pale purple vellum was die-cut with one of the dies from the Stitched Speech Bubble Edges die set (Die-Namics) and one of the sentiments from the was stamped onto it with Jet Black StazOn ink, then adhered to the top of the card.

The entire image panel was sponged with Black Soot Distress ink, then adhered to a black card.

Thanks for visiting today.

I shall enter this card into the following challenges:

Tuesday, May 16, 2017

Sea You Soon?

I celebrated Mother's Day all weekend as my gifts started arriving on Thursday. I guess that put me in the mood to create this card!


Steampunk Sea Turtle and Steampunk Baby Sea Turtle were stamped with Tuxedo Black Memento ink (Imagine Crafts), colored with Copic markers, fussy cut, and edged with black markers. Steampunk Sea Turtle and Steampunk Baby Sea Turtle's eyes, beaks, the screws on their armor, and the lenses on Steampunk Sea Turtle's periscopes were coated with several layers of Clear Gelly Glaze pen (Sakura). Steampunk Sea Turtle and Steampunk Baby Sea Turtle were then set aside for some mother-child quality time while I created a scenic background for them.

I recently received my new Distress Oxide inks (Ranger) and have been having a blast experimenting with them. Vintage Photo, Cracked Pistachio, and Broken China Distress Oxide inks were applied in various ways to 140 lb. Mixed Media cardstock (Strathmore). When I was happy with the look, Peeled Paint Distress ink was sponged over the Moving Vines stencil (The Crafter's Workshop) and Broken China Distress ink was sponged over the Gears Mini Layering stencil (Stampers Anonymous).

Media Modeling Paste (DecoArt) was scraped across the netting on the Mini Nautical Chains stencil (The Crafter's Workshop) in three places and allowed to dry. When it was dry, Media Texture Sand Paste (DecoArt) was scraped along the bottom. Some tiny gears and an anchor charm were embedded in the wet paste. When the Media Texture Sand Paste was dry, Vintage Photo Distress ink was lightly sponged to highlight the texture and add a depth to the color. 

The netting was touched up with a White Gelly Roll gel pen (Sakura), then Steampunk Sea Turtle and Steampunk Baby Sea Turtle were adhered. The image panel was matted with metallic copper, then adhered to a green card.

I Brake for Stamps has a huge and varied collection of rubber stamps that you ought to check out right now. Click HERE to check out all of the goodies! Best of all, if you buy something, you can get a 10% discount off of your purchase if you use this code: SAVE10KATHI!


Thanks for visiting today!

I shall enter this card into the following challenges:
SanDee and amelie's Steampunk Challenges: Anything Goes
Let's Craft and Create Challenges: Create a Background

Tuesday, May 9, 2017

Celebrate!


Here's a festive card featuring Good Morning Sunshine from the fabulous and funny Humorous Senior Collection of stamps (I Brake for Stamps)FYI, IBFS ships internationally!

Good Morning Sunshine was stamped with Tuxedo Black Memento ink (Imagine Crafts) and colored with Copic markers, that were chosen to match the colors of the patterned papers from the Time to Celebrate collection (Graphic 45).

Patterned paper was die-cut with one of the dies from the Rectangle Frames die set (Die-Namics) and a nameplate die (Spellbinders). White cardstock was die-cut with a "celebrate" die from the Handwritten die set (Little B), then adhered atop the nameplate.

The image panel was adhered behind the frame die-cut. The patterned paper was layered, the image panel, and sentiment nameplate were adhered to the card front, the card front was adhered to a white card, and then white pearls were added to Good Morning Sunshine's ear and the die-cut to finish the card.

I Brake for Stamps is the home for the Humorous Senior Collection of stamps, which you ought to check out right now. IBFS also has a huge and varied collection of rubber stamps where you're sure to find something you like! Click HERE to check out all of the goodies! Best of all, if you buy something, you can get a 10% discount off of your purchase if you use this code: SAVE10KATHI!


Thanks for visiting today!

I shall enter this card into the following challenges:
Sisterhood of Snarky Stampers: Y is for Yippee
Simon Says Monday Challenges: It's a Frame Up
Corrosive Challenges: Anything Goes

Sunday, May 7, 2017

Word-Up Weekend/One Layer Combo Card

I'm multi-tasking, combining this fortnight's challenge "One Layer" challenge at Stampotique Designer's Challenges  with Stampotique's Facebook Group's "Word-Up Weekends" where we share projects created with Stampotique's many Words, Phrases, Letters, and Numbers.

If you'd like the chance to win your choice of $30 worth of Stampotique stamps, you should play along with this month's challenges. Visit Stampotique Designers Challenge blog and be sure to read the rules so that you'll have the chance to win that great prize!!! Remember to check to see the deadline for all of this month's Stampotique Designers Challenges!

Here's a card with two of Stampotique's May release stamps, Isabelle (Tracy Scott) and one of the sentiments from Quotes #1 (Carol Ramsay).


Isabelle was stamped onto a 3.5" x 5" card with Jet Black Archival ink (Ranger) and colored with Zig Photo-Twin markers (EK Success). Purple Stardust Glitter Gel pen (Sakura) was used to make the baubles in Isabelle's crown sparkly. Red Stardust Glitter Gel pen added sparkle to the heart in her crown and the eyes of the skull. Orange Spica Glitter pen (Copic) was used to add glitter to the skull and crown. Clear Stardust Glitter Gel pen was used to outline the image.

The sentiment was stamped under the image with Jet Black Archival ink and the assistance of a stamp positioner. I decided that the card wasn't glittery enough so I used Clear Spectrum Noir Glitter Brush marker over the image and to underline the sentiment. Clear Gelly Glaze pen was used to add a touch of dimension and shine to the skull, heart, and baubles.

Thanks for visiting today!

Tuesday, May 2, 2017

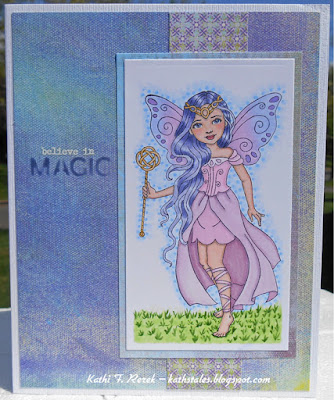
Believe in Magic!

Here's a card with Hannah from the Mythical Reflections collection by Carmen Medlin Designs, available at I Brake for Stamps. You can buy separately or as part of the wonderful five stamp set. By the way, IBFS ships internationally!


Hannah was stamped with Tuxedo Black Memento ink (Imagine Crafts) and colored with Copic markers. The image panel was die-cut with one of the dies from the 5x7 Card Creator Nestabilities die set (Spellbinders). The image panel was kept in the die while I added the grass underneath Hannah's feet and the sky around her.

Patterned paper from my stash was layered. Chipped Sapphire Distress ink (Ranger) was sponged over the word "Magic" on the Believe Dinky stencil (That's Crafty) and heat set. When dry, "believe in" from the Christmastime Remnant Rubs sheet (Idea-ology) was added above the stenciled word. The image panel was adhered, then the card front was added to a white card.

I Brake for Stamps has a huge and varied collection of rubber stamps that you ought to check out right now. Click HERE to check out all of the goodies! Best of all, if you buy something, you can get a 10% discount off of your purchase if you use this code: SAVE10KATHI!


Thanks for visiting today!