Tuesday, August 29, 2017

Savor Life's Magic!

It's the end of August, the weather here in New Jersey has been wonderfully cool, squirrels have been very busy gathering acorns, and some leaves are beginning to fall. All this means is that Autumn will be here soon, which means that Halloween rapidly approacheth! Hurray!

Here's my card featuring Mardi Gras Beads, one of the Rick St. Dennis rubber stamps that is exclusively available at I Brake for Stamps.


I know the stamp's name is Mardi Gras Beads, but I think she's perfect for Halloween too! Mardi Gras Beads was stamped with Tuxedo Black Memento ink (Imagine Crafts) onto Neenah cardstock. The image panel was die-cut with one of the dies from the Card Creator Nestabilities die set (Spellbinders) then colored with Copic markers to match the wonderful Midnight Masquerade 8x8 patterned paper pad (Graphic 45).

Three different papers from the pad were layered, then the edges were distressed to reveal the white core. The card front was adhered to an off-white card and the image panel was adhered.

I Brake for Stamps has a huge and varied collection of rubber stamps that you ought to check out right now. Just so you know, I Brake for Stamps ships internationally!

Click HERE to be whisked I Brake for Stamps to check out all of the goodies! Best of all, if you buy something, you can get a 10% discount off of your purchase if you use this coupon code:  SAVE10KATHI .


Thanks for visiting today!

Friday, August 25, 2017

Autumn Greetings

Frantic Stamper's August release of stamps and dies is called Fall GreetingsBe sure to hop over there to check out the new release,  their wonderful line of precision cutting dies and clear stamps, and other crafting goodies.

Today's card features Autumn from the Fall Words (FRA-DIE-10271) die set, the Autumn Scrolls die (FRA-DIE-10281), and the Leaf Vignettes Squares die set (FRA-DIE-10288).


This card was fairly quick, easy, and fun to create with these fabulous new Frantic Stamper diesDistress Oxide inks (Ranger), and Distress inks. Thus ends my shortest blog post ever. Tah-dah!

Thanks for visiting today!

Tuesday, August 22, 2017

Love Bird ATC

I was feeling rather birdbrained, so I decided to create an ATC featuring the Love Bird ATC rubber stamp available at I Brake for Stamps.

Here it is!

My single Love Bird was stamped with Tuxedo Black Memento ink (Imagine Crafts) onto Neenah cardstock. After googling Love Bird images, I decided on my Love Bird's coloration and colored him with the appropriate Copic markers. The lonely Love Bird's eye, beak, and talons were coated with several layers of Clear Gelly Glaze pen (Sakura) to add dimension and shine to them.

The image panel was matted with black cardstock, adhered to patterned paper from the Nature's Sketchbook 8x8 pad (Graphic 45), then matted again with black cardstock.

I Brake for Stamps has a huge and varied collection of rubber stamps that you ought to check out right now. Just so you know, I Brake for Stamps ships internationally!

Click HERE to be whisked I Brake for Stamps to check out all of the goodies! Best of all, if you buy something, you can get a 10% discount off of your purchase if you use this coupon code:  SAVE10KATHI .


Thanks for visiting today!

Friday, August 18, 2017

Get Well Soon!

Frantic Stamper's August release of stamps and dies is called Fall Greetings and includes flowers, leaves, Halloween, etc. Be sure to hop over there to check out the new release, their wonderful line of precision cutting dies and clear stamps, and other crafting goodies.

Here's a get well card that features the new Adhesive Bandage (FRA-DIE-10285) and one the dies from the very useful Stitched Double Fishtails die set (FRA-DIE-09735)


Solar Crest White cardstock (Neenah) was die-cut with the Adhesive Bandage die then colored with Copic markers. 

Red cardstock (Bazzill) was die-cut with the little heart included with the Adhesive Bandage die, one of the dies from the Stitched Double Fishtails die set, and one of the dies from the Plain Heart Nestabilities die set (Spellbinders)

VersaMark ink (Imagine Crafts) was sponged over the Circuit stencil (Brett Weldele/Stampers Anonymous) onto the heart, then Ultra-Fine Detail Silver embossing powder (Ranger) was heat set. The Adhesive Bandage die-cut was adhered over the stenciled, embossed heart, and the small red heart die-cut was added.

The "Get Well Soon" sentiment from the Thank You Cards rub-on sheet (KaiserCraft) was added to the red Stitched Double Fishtails die-cut.

Patterned paper from two different 6x6 pads were layered and the edges distressed. The clocks along the right side were detailed with a R20 marker (Copic), then the bandaged heart and sentiment die-cuts were adhered.

The card front was adhered to a red A2 card and I called it done. BTW, this card was actually sent (shocking I know) to a friend recuperating from the installation of a pacemaker. 

Thanks for visiting today.

Tuesday, August 15, 2017

Steampunk Nautilus Journal Page

Another Tuesday, another IBFS Steampunk project! This one is a journal page featuring Steampunk Nautilus from the New Steampunk rubber stamp set by Carmen Medlin Designsavailable at I Brake for Stamps.


Steampunk Nautilus was stamped with Tuxedo Black Memento ink (Imagine Crafts) onto Neenah cardstock, then the image panel was die-cut with one of the dies from the Rectangles Nestabilities die set (Spellbinders).  Steampunk Nautilus was colored with Copic markers and the image panel was sponged with Vintage Photo Distress Oxide ink (Ranger). I used a q-tip dipped into water to wet the ink, then heat set the image panel, matted it onto metallic copper cardstock (Neenah) and set it aside.

140 lb. Mixed Media cardstock (Strathmore) was cut down to fit in my journal. Salty Ocean Distress Oxide ink was sponged onto the Gears Skinny Minny stencil/mask (Joggles) and spritzed with water. Once the water beaded, the journal page was placed over top and smoothed over the stencil.

Peacock Feathers Distress Oxide ink was smooshed onto my craft mat, misted with water, the journal page was dragged through the puddled ink, spritzed with more water, then heat set. This was repeated a few times until I was happy with the coverage. This process was repeated again with Cracked Pistachio Distress Oxide ink.

Vintage Photo Distress Oxide ink was sponged across the bottom of the journal page, spritzed with water, and heat set. Iced Spruce Distress Oxide ink was sponged over the Moving Vines stencil (The Crafter's Workshop) at the bottom of the page and over the Gears Mini Layering stencil (Stampers Anonymous) at the top of the page. The ink was misted with water, allowed to spread a bit, then heat set.

Strips of 140 lb. Mixed Media cardstock were sponged with Abandoned Coral Distress Oxide ink, misted with water, then heat set. These pieces were die-cut with the coral die from the Under Water Build-a-Scene die set (Taylored Expressions).

Other strips of Mixed Media cardstock were sponged with Peeled Paint, Twisted Citron, and Lucky Clover Distress Oxide inks, then die-cut with the Seaweed Stalks die set (Memory Box).

The Seaweed Stalks and coral die-cuts were adhered along the bottom of the journal page, then Media Texture Sand Paste (DecoArt) was spread over the Vintage Photo Distress Oxide ink and the die-cuts. Some tiny pewter, brass, and copper  metal gears were pressed into the Media Texture Sand Paste. The page was set aside while I made and ate dinner. When I returned, the Texture Sand Paste was mostly dry, so it was heat set to totally dry it out. I did use my Vintage Photo Distress marker (Ranger) to add some depth and detail to the "sand".

Metallic copper cardstock was die-cut with the Small Alphabet Word Upper and Lower Case dies (All Occasion) and adhered to the top of the journal page.

A Remnant Rub (Idea-ology) was used to add the caption to the Steampunk Nautilus image panel, which was then adhered to the journal page using Black Photo Corners (3L Scrapbook Adhesives).

I Brake for Stamps has a huge and varied collection of rubber stamps that you ought to check out right now. Just so you know, I Brake for Stamps ships internationally!

Click HERE to be whisked I Brake for Stamps to check out all of the goodies! Best of all, if you buy something, you can get a 10% discount off of your purchase if you use this code: SAVE10KATHI .


Thanks for visiting today!

Friday, August 11, 2017

Happy Halloween!

Frantic Stamper's August release of stamps and dies is called Fall GreetingsBe sure to hop over there to check out the new release, their wonderful line of precision cutting dies and clear stamps, and other crafting goodies.

Here's another Halloween card, which features Frantic Stamper's Big Cauldron die set (FRA-DIE-10268), Halloween from the Fall Words die set, and Happy from the Happy Birthday die set (FRA-DIE-10194.


The Big Cauldron die set was die-cut from black cardstock and white cardstock. I popped out the flames, contents, and the highlight portions of both the black and white Big Cauldron die-cuts. The flame portion (white cardstock) was colored with Copic markers. The contents oval die-cut was run through my X (Xyron), then dipped into purple glitter. The white highlight was coated with White Glaze pen (Sakura).

Clear Stardust Glitter pen (Sakura) was was used over the design at the top of the black Cauldron die-cut and a Purple Stardust Glitter pen added a glittery touch to the drippings on the right side of the Cauldron

2.5" Wide Scor Pal-Scor Tape (Scor Pal) was used to back purple vellum, then the steam portion die of the Big Cauldron die setHalloween from the Fall Words die set, and Happy from the Happy Birthday die set were used to die-cut the vellum.

A piece of black glitter tape was placed across the bottom of a scrap of ancient hoarded patterned paper from the Eerie collection (Basic Grey), which had been edged with Black Soot Distress ink (Ranger). The Big Cauldron, its flames, and the sentiment were adhered to the card front, which was adhered to a card.

Thanks for visiting today!

Wednesday, August 9, 2017

Remember: Time Flies

Here's a Steampunk journal page with Owl Clock (Stampendous) and One Minute (Janet Klein/Stampotique)


Owl Clock was stamped with Tuxedo Black Memento ink (Imagine Crafts) onto Neenah cardstock, die-cut with one of the dies from the Card Creator Nestabilities die set (Spellbinders), then colored with Copic markers. Clear Gelly Glaze pen (Sakura) was used to add shine and dimension to Owl Clock's glasses, beak, and talons.

Candied Apple and Fired Brick Distress Oxide inks (Ranger) were smooshed onto my craft mat, spritzed with water,  and a piece of 140 Mixed Media cardstock (Strathmore) was dragged through the inky puddle, then  heat set.  This process was repeated with Faded Jeans Distress Oxide ink.

Faded Jeans and Fired Brick Distress inks were sponged over the Clocks stencil (Prima) and the Mini Schoolworks Layering stencil (Stampers Anonymous), then heat set.

One Minute was stamped with Faded Jeans Distress ink and Metallic Gold Media Fluid Acrylic paint (DecoArt).

A sheet from my spiral-bound Mixed Media Journal (Strathmore) and a large scrap of 140 lb. Mixed Media cardstock were painted with Metallic Gold Media Fluid Acrylic paint. The large scrap of painted cardstock was die-cut with "remember" from the Adventure Words die set (Sizzix) and the Alphabet Plain Lowercase Alphabet die (Impression Obsession).

The sentiments and image panel were adhered to the stenciled, inked page, which was then adhered to the journal page.

BTW, this page was meant to go into my Steampunk Journal, Volume 1 -- the Aviary. However, being a me of little brains, I used the wrong journal page for it. It was supposed to be the hole-punched journal, not the small spiral bound version. Oh well. Silly me.

Thanks for visiting today!

Tuesday, August 8, 2017

Adventure Awaits!

I'm still on the Steampunk Express, this time with a card featuring with the girl from the Steampunk Eyes set from the Eyes of Adventure collection by Carmen Medlin Designsavailable at I Brake for Stamps.


The girl from the Steampunk Eyes set was stamped with Tuxedo Black Memento ink (Imagine Crafts) onto Neenah cardstock and colored with Copic markers. The image panel was die-cut with one of the dies from the Long Rectangles Nestabilities die set (Spellbinders).  Clear Gelly Glaze pen (Sakura) was used to add shine and dimension to the lenses on Steampunk Eyes' goggles,  her watch crystal, and her buttons. Antique Linen Stickles (Ranger) was added to the perimeter of the image panel and heat set. It was fun to watch the glitter glue bubble and burst. I'm obviously easily amused.

A strip of patterned paper from the Timepiece 6x6 pad (Bo-Bunny) was embossed with the Clocks Embossing Plate (Cheery Lynn Designs), edged with Antique Linen Distress ink (Ranger), and layered over a sheet of patterned paper from the Timekeeper 6x6 pad (Marion Smith Designs). Clock-patterned washi tape was used to cover the seam between the papers. The card front was trimmed, the edges were sponged with Antique Linen Distress ink, then adhered to a card.

The Steampunk Eyes image panel was adhered to the card and the "Adventure Awaits" sentiment from the Quotations Metallic sticker sheet (Idea-ology) was added to finish the card.

I Brake for Stamps has a huge and varied collection of rubber stamps that you ought to check out right now. Just so you know, I Brake for Stamps ships internationally!

Click HERE to be whisked I Brake for Stamps to check out all of the goodies! Best of all, if you buy something, you can get a 10% discount off of your purchase if you use this code: SAVE10KATHI .


Thanks for visiting today!

Friday, August 4, 2017

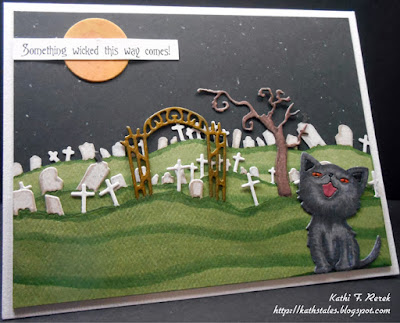
Something Wicked?

We're in the dog days of August, which means that Autumn and Halloween will soon be here! Frantic Stamper's August release of stamps and dies is called Fall Greetings. Be sure to hop over there to check out the new release, their wonderful line of precision cutting dies and clear stamps, and other crafting goodies.

Here's a Halloween card, which features Frantic Stamper's new Boneyard Edgers (FRA-DIE-10265 and the Cute Kitten (FRA-DIE-09574) dies.


140 lb. Mixed Media cardstock (Strathmore) was die-cut three times with the Boneyard Edgers, then colored with Copic markers. The crosses were colored with the Large White Bullet Nib Pitt Artist pen (Faber Castell). The cemetery gate was colored with a gold marker (Pentel).

Solar Crest White cardstock (Neenah) was die-cut with the  Cute Kitten die, then colored with Copic markers.

140 lb. Mixed Media cardstock was sponged with Fossilized Amber and Spiced Marmalade Distress Oxide inks (Ranger), spritzed with water, heat set, then die-cut with one of the dies from the Circle Nestabilities die set (Spellbinders).

The sentiment was computer generated and printed onto white cardstock with my laser printer.

The three Boneyard Edgers were layered and adhered to white speckled black cardstock.  The Distress Oxided (new word) die-cut circle was set in the sky to serve as the moon in my scene. The computer-generated sentiment was cut into a strip and layered across the moon. The entire image panel was sponged with Black Soot Distress ink and adhered to a white card. My somewhat evil Cute Kitten die-cut was adhered to the edge of the scene to finish the card.

Thanks for visiting today!

Tuesday, August 1, 2017

Steampunk Journal 3

I seem to have a lot of Steampunk mojo, so I'm sharing another Steampunky project. This time it's a journal cover featuring Steampunk Beauty from the Eclectic Steampunk rubber stamp set by Carmen Medlin Designsavailable at I Brake for Stamps.


Steampunk Beauty was stamped with Tuxedo Black Memento ink (Imagine Crafts) onto Neenah cardsttock and colored with Copic markers. The image panel was die-cut with one of the dies from the Oval Nestabilities die set (Spellbinders).  Clear Gelly Glaze pen (Sakura) was used to add shine and dimension to the Steampunk Beauty monocle, the watch crystal, and the screws.

Black cardstock was die-cut with the matching Scalloped Oval Nestabilities die to serve as a mat for the Steampunk Beauty oval.

I used one of the Worn Journals (Idea-ology) as the base for my third Steampunk Journal. Gold metallic textured specialty paper (from my Fibermark stash) was sponged with Jet Black Archival ink (Ranger) to bring down the shine a bit. I cut the piece to 3" x 7", scored it, and backed it with double-sided tape to adhere it securely to the spine.

Patterned papers from the Timekeeper 6x6 pad (Marion Smith Designs) were edged with Jet Black Archival ink and layered onto the front and back covers of the journal.

The Double Scallop Border die (Die-namics) was used to die-cut black cardstock. The textured gold metallic cardstock used for the spine was die-cut with one of the dies from the Chains die set (Elizabeth Craft Designs) and two sizes of Upper and Lower Alphabet dies (All Occasion).

The image oval and the die-cut elements were adhered to the journal, then the ring binder insert was attached using screw-top brads. Tiny gears were adhered to the center of metallic flowers (Idea-ology and Prima Designs) with brads and/or glue. These flowers were added to the top right corner of the journal cover.

A hole was poked through the spine, a Ring Fastener (Idea-ology) and a watch charm and chain were added. I wanted to add bird and  heart charms, but I couldn't find them. No doubt they're someplace safe in the black hole that is my craft room (currently undergoing a remodel).

I Brake for Stamps has a huge and varied collection of rubber stamps that you ought to check out right now. Just so you know, I Brake for Stamps ships internationally!

Click HERE to be whisked I Brake for Stamps to check out all of the goodies! Best of all, if you buy something, you can get a 10% discount off of your purchase if you use this code:  SAVE10KATHI .


Thanks for visiting today!