Saturday, September 30, 2017

A Sweet Gift Card!

I don't know about you, but I tend to give a lot of cards containing gift cards during the holiday season. Here's one  with  Sweet Holly Penguin (FRA-DIE-10309) and Gift Card Corner Holder (FRA-DIE-10301).

Outside

Inside:

Sweet Holly Penguin was die-cut from white cardstock and colored with Copic markers. Several layers of Clear Gelly Glaze pen (Sakura) were added to the Sweet Holly Penguin's holly berries to make 'em dimensional and shiny.

Old patterned paper was layered and Morning Dew Nuvo Crystal Drops (Tonic Studio) was added to the seam between the papers and to the grey and blue dotted paper. The Sweet Holly Penguin was adhered and more Morning Dew Nuvo Crystal Drop were added underneath him so he appeared to be on icy, snowy ground. 

White cardstock was cut to two 4" x 5.25" panels. The image panel was matted with one of them, then adhered adhered to an ice blue card.

The second trimmed white panel was die-cut with the Gift Card Corner Holder die, then adhered to the inside of the blue card. An Starbucks gift card was added to illustrate the way the Gift Card Corner Holder works.

A scrap of the icy blue cardstock was die-cut with the the sentiment "A Gift" from the Gift Card Corner Holder die set, then adhered to the card front to finish the card.

Thank you for visiting today!

Christmas Cardinals

Here's another holiday card with the Modern Cardinals (FRA-DIE-10308) die set from Frantic Stamper's September release.


Both cardinals from the the Modern Cardinals die set were die-cut from red textured specialty paper (FiberMark). The mask, beak, and eyes were die-cut from black, yellow, and white cardstock respectively. The red portions of cardinal were edged with a dark red Copic marker, then the both Modern Cardinals were assembled.

Patterned paper was layered and silver foil border stickers were adhered over the seams. Silver Metallic Leafing pen (Krylon) was run along all four sides to edge the card front. The cardinals were adhered to the card front.

Another piece of red textured specialty paper was adhered to 5.5" square card and the card front was adhered to complete the piece.

Thanks for visiting today!

Friday, September 29, 2017

Happy Holidays!

Here's the third holiday card with the Truck Tidings Cling Stamp and Die set (Stampendous)


The truck and the gift pile from the Truck Tidings set were stamped with Tuxedo Black Memento ink (Imagine Crafts), colored with Copic markers, die-cut with their corresponding dies, then edged with a black marker. The headlight was coated with several layers of Clear Gelly Glaze pen to add glassy dimension and shine.

Hickory Smoke Distress ink (Ranger) was sponged over the Cityscape stencil (The Crafter's Workshop) onto patterned paper. The paper was then trimmed and edged with more Hickory Smoke Distress ink. The Happy Holiday sentiment from Christmastime Remnant Rubs sheet (Idea-ology) was added to the top of the stenciled paper. Road-patterned washi tape was adhered along the bottom of the stenciled patterned paper, then the panel was matted with coordinating patterned paper.

A small scrap of vellum was adhered behind the truck's open window and the pile of gifts was adhered slightly behind the truck's bed. The truck was adhered to the card front as shown. The card front was adhered to an A2 card.

Thanks for visiting today!

Thursday, September 28, 2017

Season's Greetings


The truck and the gift pile from the Truck Tidings set were stamped with Tuxedo Black Memento ink (Imagine Crafts), colored with Copic markers, die-cut with their corresponding dies, then edged with a black marker. The headlight was coated with several layers of Clear Gelly Glaze pen to add glassy dimension and shine.

White cardstock was die-cut with the Stitched Valley dies (Die-namics), colored with Copic markers, then adhered to piece of patterned paper from a 6x6 pad. Road-patterned washi tape was adhered along the bottom of the patterned paper.

A small scrap of vellum was adhered behind the truck's open window and the pile of gifts was adhered slightly behind the truck's bed. The truck was adhered to the card front as shown. The card front was adhered to an A2 card.

Grey cardstock was die-cut with the Season's Greetings die (Elizabeth Craft Designs) and adhered to the top right to finish the card.

Thanks for visiting today!

Merry Christmas


I submitted a trio of cards using the Truck Tidings Cling Stamp and Die set (Stampendous). Unfortunately, they were not picked up for publication, though the cards themselves were then donated to charity by the publication. So, it's a win of sorts. That means that I can share the cards now, which is a good thing since I've been kept away from my craftroom because of  the renovation of my house and my mouth. Neither project has been much fun.

The truck and the tree from the Truck Tidings set were stamped with Tuxedo Black Memento ink (Imagine Crafts), colored with Copic markers, die-cut with their corresponding dies, then edged with a black marker. The ornaments on the tree were touched with a Clear Stardust marker (Sakura) to add a touch of bling to them. The ornaments, headlight, and the side mirror were all coated with several layers of Clear Gelly Glaze pen to add glassy dimension and shine.

Bundled Sage Distress ink (Ranger) was sponged over the fir tree on the Woodland Mini Layering Stencil (Stamper's Anonymous) onto patterned paper from a 6x6 pad in a repeating manner, varying the darkness of the ink. The patterned paper was edged with Bundled Sage and Hickory Smoke Distress inks. Road-patterned washi tape was adhered along the bottom of the patterned paper. The stenciled patterned paper was adhered to a card.

A small scrap of vellum was adhered behind the truck's open window and the tree was adhered slightly behind the truck's bed. The truck was adhered to the card front as shown.

Grey cardstock was die-cut with the Merry Christmas dies (All Occasions) and the sentiment was added to finish the card.

Thanks for visiting today!

Tuesday, September 26, 2017

Happy Halloween!

Here's a Halloween card featuring the ever-so-dapper Skelly Tonn from the Randi Dandi Halloween Series 1 Collection of Rick St. Dennis rubber stamps available exclusively at I Brake for Stamps.


Skelly Tonn was stamped with Tuxedo Black Memento ink (Imagine Crafts) and colored with Copic markers. The tip of his cigarette, eyes, and nose apertures of the skulls on his bowtie and fashionable cufflink received dabs of Red, Orange, and Yellow Spica Glitter pens(Copic). The skulls, buttons, and his cigarette holder were coated with several layers of Clear Gelly Glaze pen (Sakura) to add dimension and shine. The Skelly Tonn image was then fussy-cut and edged with a black marker.

I selected a sheet of patterned paper from the Enchanted 6x6 pad (Authentique), then placed the Skelly Tonn image upon it. I loosely traced Skelly Tonn's shape onto the patterned paper using a charcoal pencil, lifted the image, then used the charcoal pencil to color the traced image. When I was happy with the coverage, I also used the charcoal pencil to edge the image panel. The image was loosely adhered inside the charcoal-colored area.

Orange cardstock was cut and folded to form the card. The image panel was adhered to it. A scrap of the excess cardstock was die-cut with a Happy Halloween sentiment die. Pale yellow orange vellum was die-cut with the shadow dies from Happy Halloween sentiment die set and the vapor die from the Grim Cauldron die set (Memory Box). The vapor die-cut was adhered behind the cigarette on the Skelly Tonn image, which was then more firmly adhered to the image panel. The orange Happy Halloween sentiments were adhered to their vellum shadow counterparts, which were then adhered to finish the card.

I Brake for Stamps has a huge and varied collection of rubber stamps that you ought to check out right now. Just so you know, I Brake for Stamps ships internationally!

Click HERE to be whisked I Brake for Stamps to check out all of the goodies! Best of all, if you buy something, you can get a 10% discount off of your purchase if you use this coupon code:  SAVE10KATHI .


Thanks for visiting today!

Monday, September 25, 2017

A Merry Christmas Gift

Here's a gift card tag that's perfect for the holidays! It uses Gift Card Corner Holder (FRA-DIE-10301) and Belly Band (FRA-DIE-10300) dies.


A scrap of very old gift-themed patterned paper was cut to a rectangle, then die-cut with the part of the Gift Card Corner Holder die, which cuts scalloped notches into opposite corners that are perfectly sized to hold a gift card. 

A sheet of red cardstock was cut to a tag shape. Scraps from the red cardstock were die-cut with "A Gift" from the Gift Card Corner Holder set and with the Belly Band  die

The sentiment was adhered to the tag front that was then mounted onto the red cardstock tag. A (used) iTunes gift card was tucked into scalloped notches created by the Gift Card Corner Holder die, the Belly Band  die-cut was secured around the tag and the gift card, and a foil sentiment sticker was added to the Belly Band. Green gingham ribbon was added to finish the tag.

Thanks for visiting today!


Saturday, September 23, 2017

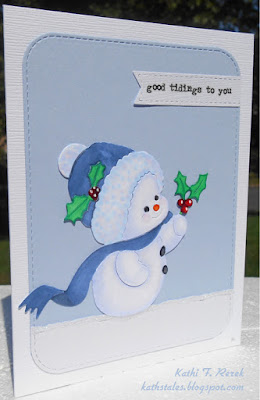
Good Tidings to You


The Sweet Holly Snowman was die-cut from white cardstock then colored with Copic markers. Several layers of Clear Gelly Glaze pen (Sakura) were used to add dimension and shine to the holly's berries and the snowman's buttons. 

Blue and white cardstock were die-cut with one of the dies from the Stitched Rounded Rectangles. The white cardstock was torn, layered over the blue die-cut, then Morning Dew Nuvo Crystal Drops (Tonic Studio) was used on the seam between the blue and white cardstock.

White cardstock was die-cut with one of the dies from the  Stitched Double Fishtails Labels die set. A sentiment from the Christmastime Remnant Rub sheet (Idea-ology) was added.

Stitched Rounded Rectangle was adhered to a white card. The Sweet Holly Snowman was adhered to the card front, then the sentiment Fishtails Label was adhered to finish the card.

Thanks for visiting today!


Monday, September 18, 2017

Happy Holidays!


The bodies and wings of both of the cardinals included in the Modern Cardinals die set were die-cut from red and white patterned paper from the Jovial collection (Basic Grey). They were then colored with Copic markers. Black, white, and gold cardstock were die-cut with the mask and beak dies from Modern Cardinals die set. The cardinals were pieced together and set aside.


Metallic gold cardstock was die-cut with the Autumn Scrolls and Stitched Double Fishtail Labels dies. A scrap of the same red patterned paper was also die-cut with one of the Fishtail Labels dies, then colored with Copic markers.

Patterned paper from the Jovial 6x6 pad was edged with a Copic marker, matted with gold metallic cardstock, then adhered to a red card.

The Autumn Scrolls die-cuts were adhered to the bottom of the card front. The two Modern Cardinals were adhered atop the Autumn Scrolls.

A sentiment from the Seasonal Chit-Chat sticker book (Idea-ology) was adhered to red Fishtail Label, matted with the gold Fishtail Label, then adhered to the card to finish it.

Thanks for visiting today!

Saturday, September 16, 2017

Christmas Greetings

Both Halloween and Christmas stuff is in the stores right now, so I guess it's time to start making holiday cards. Frantic Stamper's September release is all about winter and the holidays.

Here's my card with Sweet Holly Penguin (FRA-DIE-10309)the Belly Band (FRA-DIE-10300), and the Stitched Scene Builder Edgers (FRA-DIE-09403) dies.


Sweet Holly Penguin and the Belly Band were die-cut from white cardstock and colored with Copic markers. Several layers of Clear Gelly Glaze pen (Sakura) were added to the Sweet Holly Penguin's holly berries to make 'em dimensional and shiny.

Grey cardstock was die-cut with the Stitched Scene Builder Edgers, then layered over patterned paper. Clear Stardust Glitter pen (Sakura) was used to add a touch of glitter to the Stitched Scene Builder Edgers  and the Belly Band

Christmastime Remnant Rubs (Idea-ology) were used to add the sentiment to the Belly Band, which was then adhered to the card front. The Sweet Holly Penguin was adhered to the scene to finish the card.

Thank you for visiting today.

Tuesday, September 12, 2017

Happy Halloween!

Here's my card featuring Tworki, one of the Rick St. Dennis rubber stamps that is exclusively available at I Brake for Stamps.


I decided that Tworki would make a fabulous ghost, so he was stamped with Tuxedo Black Memento ink (Imagine Crafts) onto a piece of very old patterned paper from a 6x6 pad, then colored with Copic markers. When Tworki was fully colored, the patterned paper was sponged with Wild Honey Distress ink (Ranger), then edged with Black Soot Distress ink

The image panel was matted with green cardstock, which was then adhered to a black card. A scrap of the leftover green cardstock was die-cut with one of the dies from the A Birdie Told Me die set (Lawn Fawn). "Happy Halloween" from the Gothic Remnant Rubs (Idea-ology) was added to the speech bubble to finish the card.

I Brake for Stamps has a huge and varied collection of rubber stamps that you ought to check out right now. Just so you know, I Brake for Stamps ships internationally!

Click HERE to be whisked I Brake for Stamps to check out all of the goodies! Best of all, if you buy something, you can get a 10% discount off of your purchase if you use this coupon code:  SAVE10KATHI .


Thanks for visiting today!

Tuesday, September 5, 2017

Floral Sugar Skull

The weather has been cool lately, which makes me think of Autumn, which makes me think of Halloween and the Day of the Dead.


The Sugar Floral Skull was stamped with Tuxedo Black Memento ink (Imagine Crafts) onto Neenah cardstock, fussy-cut, colored with Copic markers, then edged with a black marker. 

Patterned papers from an old 6x6 pad by Authentique were layered, then matted with yellow-orange cardstock. The Sugar Floral Skull was adhered and the card front was mounted onto a square black card.

I Brake for Stamps has a huge and varied collection of rubber stamps that you ought to check out right now. Just so you know, I Brake for Stamps ships internationally!

Click HERE to be whisked I Brake for Stamps to check out all of the goodies! Best of all, if you buy something, you can get a 10% discount off of your purchase if you use this code: SAVE10KATHI .


Thanks for visiting today!